Views: 222 Author: Tina Publish Time: 2025-10-29 Origin: Site


Content Menu
● Understanding Pool Filter Sand and Its Importance
>> How Does a Sand Filter Work?
● Why and When to Change Pool Filter Sand
>> Key Signs That It's Time to Replace Filter Sand
● How Often Should You Change Sand?
● Step-by-Step: How to Change Swimming Pool Filter Sand
>> 1. Power Down and Secure the System
>> 3. Remove the Multiport Valve or Filter Head
>> 6. Inspect and Maintain Laterals
>> 7. Clean and Prepare the Tank
>> 9. Reassemble and Lubricate
>> 10. Reconnect Hoses and Power On
>> 12. Test System and Adjust Chemicals
● Advanced OEM/Brand Considerations
● Troubleshooting and Maintenance Tips
>> 1. How often should pool filter sand be replaced?
>> 2. How will I know when to change the sand?
>> 3. Can I use any sand in my pool filter?
>> 4. Are there eco-friendly or advanced alternatives to sand?
>> 5. What should I do if sand leaks into the pool after changing it?
A pristine, sparkling pool starts with a well-maintained filtration system. The filter sand is critical—it's the silent engine that ensures your water is crystal-clear, safe, and inviting for every swimmer. Whether you're a pool owner, a maintenance professional, or an OEM brand manager, understanding how to change swimming pool filter sand is essential for delivering lasting water quality, efficient system performance, and low operating costs.[1][2][5][6][9][11]

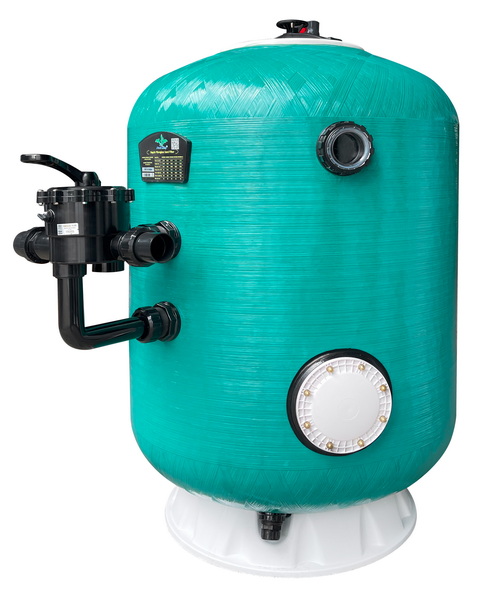
The sand in your pool filter acts as the primary filtration medium, trapping dirt, oils, dead algae, bacteria, and contaminants as water cycles through the filter bed. High-purity, angular-grain silica sand is typically used. The grains' rough surfaces act as millions of tiny nets, efficiently snaring suspended particles.[2][6][1]
As pool water is drawn into the filter tank by the pump, it percolates through several graded layers of sand. Coarse sand beds on the bottom support the finer, sharply-angled silica sand on top, which does the bulk of the filtration work. Clean water is returned to the pool, while debris accumulates in the sand bed until removed by backwashing.[1][2]
Using manufacturer-specified, well-graded filter sand ensures the filter traps fine debris (as small as 20 microns) while maintaining good circulation and avoiding clogging. Poor-quality or incorrectly sized sand may lead to cloudy water, increased chemical usage, and rapid equipment wear.
Even the best sand loses effectiveness over time. Grains become rounded and smooth, reducing their filtration ability. Dirt, oils, and minerals build up, leading to “channeling,” where water cuts tunnels through the sand bed and bypasses filtration altogether.[6][14][1]
- Persistent cloudy water, even after shocks and routine cleaning.[14][1]
- Frequent need to backwash, or backwash cycles that don't clear the filter.[6]
- High or fluctuating pressure readings (often over 15–20 psi).[14][6]
- Sand returning to the pool—often from cracked laterals or worn sand beds.[4]
- Channeling or tunneling observed during inspection.
For residential pools, changing the filter sand every 3–5 years is typical. High-traffic commercial pools, pools with hard water or heavy debris, or facilities using lots of chemicals require more frequent changes—often every 2–3 years. Check your OEM or manufacturer guidelines for specifics.[11][15][1][6]
Having the right tools and supplies is vital for safe, effective sand replacement:
- OEM-approved pool filter sand (or alternative filter media).[2][11][6]
- Shop vacuum or industrial wet/dry vac.
- Garden hose with spray nozzle.
- Replacement O-ring and food-grade silicone lubricant for the multiport valve.[2]
- Screwdriver, pipe wrench, utility knife, duct tape or a rubber plug for the standpipe.[4][1]
- New drain cap and necessary replacement parts for laterals or standpipe (optional).
- Safety gear: gloves, eye protection, and a face mask if dealing with old, contaminated sand.[4]

Follow this process for a safe, complete sand change—whether you're servicing a backyard pool or a commercial OEM installation.
- Turn off the pool pump and timer circuits.[5][2][4]
- Shut off the electrical breaker to ensure complete safety.
- Close pool valves, or disconnect hoses to prevent water loss.
- Locate and remove the drain plug at the bottom of the filter tank.[5][4]
- Allow the tank to drain fully before proceeding.
- Unscrew unions and remove straps/clamps securing the multiport valve.[2][4]
- Carefully lift the valve off the standpipe. Avoid excessive twisting to prevent pipe cracks.
- Cover the exposed standpipe at the center of the tank with duct tape or a rubber plug.
- This prevents new sand from falling inside and damaging internal parts.
- Use a shop vac or scoop to remove all old sand from the tank.[5][6][4]
- Wear gloves for sanitary reasons—old sand often harbors trapped bacteria and algae.
- Gently pull out the lateral assembly from the base of the tank; rotate laterals upward as needed.[4][2]
- Inspect each lateral for cracks or buildup. Soak in cleaning solution as needed, then rinse and reinstall.
- Replace any damaged laterals promptly to prevent sand leakage.
- Rinse the inside of the empty tank with a hose to remove old debris.[6][2][4]
- Inspect and replace the drain cap if necessary.
- With the standpipe still covered, slowly add fresh filter sand, ensuring the standpipe stays centered.[11][2][6]
- Fill the tank to the manufacturer's recommended level (usually about 2/3 to 3/4 full).
- Level the sand bed for even filtration.
- Remove the tape or plug from the standpipe.
- Inspect the multiport valve O-ring; lubricate or replace if needed, then reinstall the valve.[2]
- Secure all unions or hoses to the filter and pump.
- Ensure all connections are tight and the system is leak-free.
- Set the valve to “Backwash” and turn on the pump for 2–3 minutes, or until the sight glass runs clear.[5][4][2]
- Switch to “Rinse” for one minute, then finally to the “Filter” setting.
- Run the system and check for proper pressure and flow.
- Inspect for leaks at valves/unions and observe filter pressure for a stable reading.
- Test and adjust pool water chemistry—new sand may slightly alter pH and alkalinity.
For OEMs and industrial pool managers, changing sand is also about maintaining system longevity, minimizing downtime, and maximizing water quality. Certain pro tips will help your brand stand out:
- Use Only Certified Media: Always use manufacturer-certified sand or compatible advanced filter media such as glass media, Filtra Balls, or DE powder, especially if exporting overseas.[15][11][6]
- Upgrade for Performance: Consider eco-friendly glass filter sand—it traps even finer particles and lasts longer than traditional sand, offering a premium option for OEM or B2B buyers.[6]
- Maintain Accurate Records: Log the date and details of each sand change for warranty purposes and proactive pool management.
- Train Your Team: Ensure technicians are trained in safe, standardized sand change procedures to avoid costly mistakes and uphold repair warranties.
Even after a proper sand change, minor issues can arise. Here's how to address the most common:
- High Pressure After Sand Change: Indicates channeling or too much sand—remove a small amount and re-backwash.[14][6]
- Sand in Pool: Usually due to cracked laterals or improper reassembly.
- Cloudy Water Post Change: Let the system circulate non-stop for 24–48 hours and check chemistry; sometimes extended backwashing is needed.[1][14]
- Leaks Around the Valve: May be caused by a worn or pinched O-ring—always check and lubricate or replace during reassembly.
Changing your swimming pool filter sand is a vital part of pool maintenance for both individuals and commercial facilities. This process ensures water stays clear, equipment operates at peak efficiency, and brand reputations for quality are upheld. Follow this guide for step-by-step sand replacement, select the right certified media, and combine it with diligent system checks for results that exceed expectations. For advanced OEM/B2B needs, relying on a China-based specialist factory with smart manufacturing can further elevate your brand's global competitiveness.

Pool filter sand should be replaced every 3–5 years for most homes, or every 2–3 years with heavy use or in commercial environments.[11][1][6]
Main signs: persistent cloudy water, high pressure readings, repeated backwashing, or sand returning to the pool.[1][14][6]
No. Only use pool filter sand or certified alternatives—regular sand can damage your system and void warranties.[11][2][6]
Yes. Glass filter media and Filtra Balls are OEM-approved, lasting longer and capturing finer debris than classic sand.[6]
Shut off the system and inspect for damaged laterals or an improperly installed standpipe, then replace defective parts and redo the process as needed.[14][4][2]
[1](https://boutique.piscinehippocampe.ca/en/blogs/guide-piscine/changer-sable-filtreur-piscine-guide)
[2](https://www.swimmingpool.com/maintenance/pump&filter/changing-sand-in-your-pool-filter/)
[3](https://www.youtube.com/watch?v=v9ghBgNkv-4)
[4](https://www.thepoolfactory.com/blogs/pool-care/how-to-change-the-sand-in-a-pool-filter)
[5](https://splashfiberglasspoolcompany.com/a-guide-to-know-how-often-to-change-sand-in-pool-filter/)
[6](https://www.doheny.com/help/pool-filter-sand)
[7](https://www.youtube.com/watch?v=ZNH9JLufzUM)
[8](https://www.reddit.com/r/swimmingpools/comments/c5fyrs/how_to_change_sand_in_this_sand_filter/)
[9](https://www.memphispool.com/help-advice/changing-your-filter-sand/)
[10](https://www.youtube.com/watch?v=C70OeMKv8AY)
[11](https://www.ukpoolstore.co.uk/product/swimming-pool-filter-sand/)
[12](https://www.shutterstock.com/search/pool-filter-sand)
[13](https://www.istockphoto.com/photos/pool-filter-sand)
[14](https://poolsoffun.com/4-signs-its-time-to-change-your-filter-sand/)
[15](https://www.zodiacpoolblog.com/en/2015/may/changesandfilter)
[16](https://www.youtube.com/watch?v=qLDFmeqxVL4)
[17](https://www.youtube.com/watch?v=LB3tuaYfpnc)
